All Posts in post-production

8 Proven Strategies for a Successful Commercial

What does it take to make a good commercial? I’m sure in your lifetime you’ve seen plenty of good ones on TV or online. In 2015, some of the best commercials were the Budweiser lost dog, the Always Like A Girl, and the Fiat Blue Pill. These commercials are fun, entertaining, and leave a lasting impression.

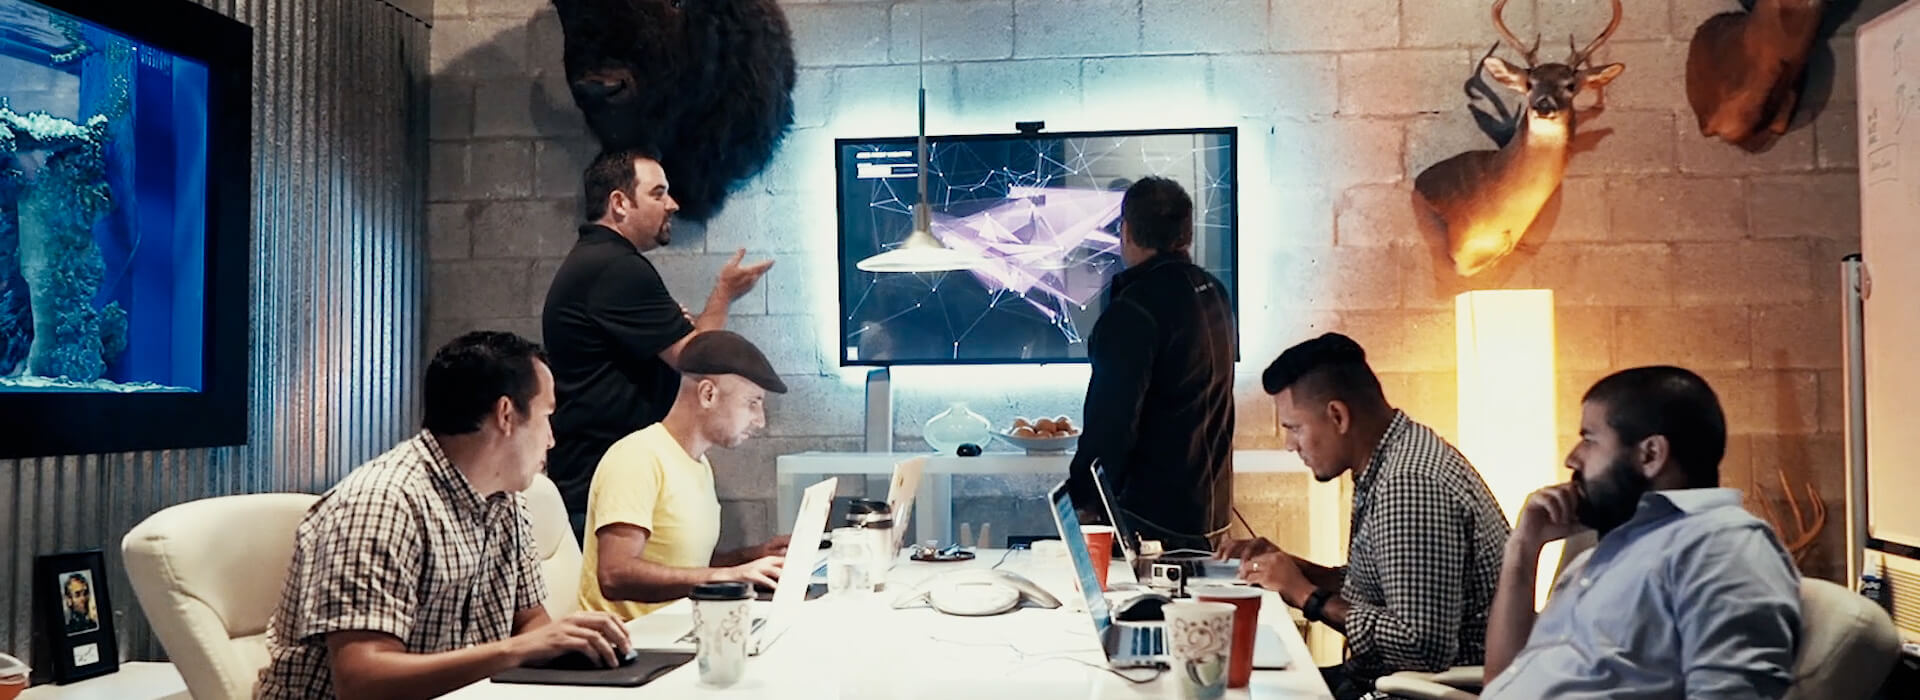
Wrecking Ball recently produced a commercial for Atlassian’s product: HipChat. It stars Wrecking Ball’s own employees using the product. Check it out:

Nice, huh? Are you interested in producing a similarly awesome commercial? In this article, we’re going to discuss the proven strategies that Wrecking Ball utilized when we produced this successful commercial.

happy_eating_salad1. People Are Essential

Your commercial must include people. As humans, we are drawn to images of people. In addition, the people in your commercial need to belong to the target audience of your product. Viewers want to see people using your product. Try to avoid going over the top expressing satisfaction using your product. You don’t want something as cheesy as women laughing alone while eating salad.

2. Plan Out Your Video

It’s tempting to cover every detail about your product, but you must be mindful of the limited time you have. Try to focus on essential highlights and key features of your product. Display them in such a way that viewers can tell the story of your product even if the volume is turned down.

3. Write a Script

Having a plan and putting together a script is essential. The shorter your script time the better. The traditional duration for a commercial is 30 seconds. We recommend that commercials made for online viewing (i.e. YouTube) should not exceed 15 seconds. Keep sentences short and in simple language. Audio should be clear enough that if the viewer is in another room and your commercial plays, they can understand what the commercial is about.

4. Audio and Video Must Match

This detail is easily overlooked: audio and video must match. For example, if the audio is mentioning a TV, show the TV being mentioned. Don’t show an irrelevant shot such as the camera panning over your store’s building. Merging audio and video creates a powerful sales tool.
Vanessa using HipChatThis scene from Wrecking Ball's video matches the speaker's dialogue

5. Never Forget Your Call to Action

The most vital part of a commercial is the call to action. You want your customers to buy, act now, visit today, etc. Include the URL to your website, your phone number, and (if you have a storefront) your street address. I recommend this article for help coming up with a great call to action: Hook, Line, and Sinker: 7 Tips for a Killer Call-to-Action.

6. Stick to Time

Be mindful of the duration of your commercial. If you hired a production company, you might have bought a 30-second commercial package. Resist the temptation to make it longer. Don’t forget that commercials for online viewing should not exceed 15 seconds.

7. The First Few Seconds Are Everything

Studies have shown that the average Internet user has an attention span of 7-12 seconds. With such little time to grab the viewer’s attention, it is essential for the beginning of your commercial to be engaging, showing only the juiciest parts. You could begin with an interesting, open-ended question. Or maybe sprinkle a bit of controversy with something shocking. To stand out you need to be bold. Most importantly, have fun! Your commercial doesn’t have to be stiff and strictly professional.

8. Hire a Production Company

This point should be obvious: to have a professional commercial you need to hire professionals. They’ll do all the work for you and handle all aspects of your commercial. If you’re on a budget, some production companies even offer $100 commercial packages.

You could, however, get away with an amateur commercial for YouTube at zero cost. The tricky part here is that your commercial can’t be commercial. It would need to be 99% educational on an interesting topic, and 1% commercial at the end with only a brief mention of your product. If your YouTube video feels too much like a commercial then people will ignore it.

Conclusion

In this article, we discussed the proven strategies that Wrecking Ball used to make a successful commercial. In short, it all boils down to good planning. Something as important as your product was not meant to be advertised with something rushed. Take your time and do it right.

Learn More

We recommend viewing the following video for learning more about making a successful commercial:

How to Make an Awesome Product Demo for Social Media

What’s the most effective way to demo a product using social media? It can be challenging when you consider that the attention span of the average user is less than 8 seconds. A full product demo is too long. The best way is to make a shorter, more focused and engaging product demo.

In this article we’re going to walk you through making an awesome, highly engaging product demo for social media.

1. Video or GIF?

The first step is deciding the right format to produce the demo. The two most common solutions are video and animated GIF. Choosing the right one is important because it will ultimately affect the style of the demo, and the options you have available.
Video vs GIF quality comparisonVideo (left) vs GIF (right) quality comparison

Video is generally the better choice because of its higher quality. The range of colors is virtually unlimited, and animation is very smooth at 29 fps.

Animated GIFs are easier to share than video, but have several limitations. Limited to 256 colors, you’re usually forced to use a flat design style with no photography. GIFs are limited to 500 frames (15-20s), and even at 24fps, the result feels slightly choppy.

2. Animation or Screen Recordings?

The next step is deciding whether the demo will be composed of screen recordings or a custom animation.

Screen recordings will get the job done quickest and easiest, but are not as attractive as animations. This involves using screen capture software to record a user’s interactions with the product. Screen recordings will likely make your product demo look too much like a tutorial, and usually need some kind of voiceover to add any excitement. If you want to try this option, here are some free screen recorders to help:

For dynamic, engaging results, animations are going to be your best option. The process is more time consuming, but the control and flexibility it affords is worth the effort. You can create unique ways to emphasize key product features and add excitement any way you like. The only drawback is animations take longer to compose, and it can be a tedious process when applying revisions.

3. Storyboard

The third step is planning and drawing up a storyboard. While it is tempting to cover every feature of your product, the key is to keep it short and highly engaging. Cover only the most essential features, then provide links for viewers to find additional details. Ask yourself: what makes your product awesome? What does it have that competitors don’t? The trick is to find the right balance between informative and memorable.

CreativeSync Storyboard in Sketch

CreativeSync Storyboard in Sketch

There’s no right or wrong way to storyboard your product demo as long as it’s in a format that works best for you and your team. What worked best for our team was to make high fidelity comps in Sketch.

With this format it was easy for everyone to review the product demo and get a good idea of the look and feel. With Sketch it was easy for the animator to export graphics for the final video.

4. General Tips

Here are some general tips to keep in mind when storyboarding your demo:

  • Keep text to an absolute minimum. Let the animation (or screen recording) do the talking.
  • To decrease visual noise, when possible isolate the areas of the product to focus on key features in action. Hide or ghost out areas of the product that are not in use. View below for an example.
  • It’s essential for click or touch gestures to be highly visible and clear. Sometimes you may have to put a glow or highlight around a button to bring it into focus.
  • Be highly conscious of pacing. You know how the product works, but viewers need you to gently usher them through the movements and interactions. Move too quickly, and you might lose them. Move too slowly and they’ll simply move on.
  • Voiceover narration is helpful, but not required.
Example of high noise (left) and low noise (right) Example of high noise (left) and low noise (right)

5. Creation

If you chose to create an animation, Adobe Animate (formerly Adobe Flash) and Adobe After Effects are great options which specialize in animation. Both programs can make your animation cool with 3D rotation effects and smooth with tween easing.

If you chose to create a compilation of screen recordings, professional video software is essential for the best result. I recommend Final Cut Pro (Mac) or Adobe Premiere. There are free video editors out there, but we discourage using them to avoid ending up with an unmarketable, low-quality result.

The most challenging part of the demo is finalizing the pace. You don’t want it to be too fast or too slow. Get as many people as you can to look over the finished demo. Gather feedback on the pace to perfect the timing of every slide in your demo.

Here’s an example of a product demo by Wrecking Ball:

6. Publish

The following are some details pertaining to uploading video or animated GIFs to social media:

  • Facebook: Upload video to take advantage of autoplay. Animated GIFs cannot be uploaded. Rather, GIFs need to be hosted elsewhere (i.e. on Tumblr) then copy their direct URL over.
  • Twitter: You can upload video or an animated GIF, but you’re limited to 30 seconds duration. If your product demo exceeds 30 seconds then you must upload it to YouTube or Vimeo to share on Twitter.
  • Tumblr: Videos and animated GIFs can be uploaded.
  • Pinterest & Google+: Animated GIFs can be uploaded. Video cannot be uploaded; you need to share from YouTube.
  • Instagram: Animated GIFs cannot be uploaded unless converted to video. Videos can only be up to 15 seconds duration.
  • Blogs: You can do whatever you want, however you want. If you’re using GIFs be careful with file sizes, as GIFs can easily bulk up to large sizes.

Wherever possible, upload your product demo directly to social media, versus uploading to YouTube and then sharing to social media. Many social sites already autoplay videos/animations, which means the viewer doesn't need a secondary click to view your work.

Conclusion

In this article we discussed the technical requirements, planning, and strategy involved to make the best demo of a product for the most effective promotion on social media. Remember, the most effective social media demos need to be short and sweet. Avoid the temptation to throw in too much information. Be mindful of the small details pertaining to publishing on specific social media. By exercising all of these concepts and ideas, you will have yourself an awesome product demo!

Further Reading